I crocheted these cute little ornaments over the last couple of afternoons. I still need to decorate the wreath with some little red dots - beads, paint, something, I don't know - I have to see what I have. :)
Wreath
- knit-cro-sheen
- 1 1/2" diameter plastic ring
- sz. 1 steel hook
Rnd 1: Sc around plastic ring to completely cover - make sure you end up with an even number of sc's. Join with a sl st to 1st sc.
Rnd 2: Ch 1, sc in same sc, ch 6, *skip next sc, sc in next sc, ch 6. Repeat from * around.
Rnd 3: -this rnd will be worked in the skipped sc sts of rnd 2-
Sc in next sc, *ch 4, sc in next sc. Repeat from * around. Ch 30, join with a sl st to 1st sc. End off.
-decorate as desired-
***Debi Y's version***
Santa
- face color, white & red ww acrylic yarn
- I hook
Rnd 1: With face color ch 3, 5 dc in 3rd ch from hook, work 1 more dc changing to white, work 6 more dc. Join with a sl st to 1st dc. (12 dc)
Rnd 2: Ch 1, 2 sc in same dc, 2 sc in next 5 dc, (hdc, dc)in next dc, 2 dc in next 4 dc, (dc, hdc) in next dc. Join with a sl st to 1st sc.
Rnd 3: Ch 1, turn, sc in the hdc, ch 2, *sc in next dc, ch 2. Repeat from * 10 times, sc in the hdc, sl st in next sc. End off.
-turn piece back around-
hat:
Join red with a sc in 2nd sc, sc in same st. Sc in next 3 sc, 2 sc in next sc, sc in next 3 sc, 2 sc in next sc, ch 3, treble around last sc. End off.
-decorate as desired-
***Debi Y's version***
Friday, December 17, 2010
Friday, November 26, 2010
~ My blue bag ~
A very basic oval bag.
Materials:
- 4 1/2 oz. light blue worsted weight 4-ply acrylic
- 4 1/2 oz. variegated blues and brown bulky weight acrylic
- 1 pair light blue round purse handles
- L hook (if you crochet loose, use a J or a K hook - the bag fabric has to be tight)
- plastic canvas (for bottom liner)
Size: approximately 13 1/2" x 8" x 3 1/2"
Notes:
- do not join rounds, mark 1st stitch with a stitch marker.
- I crochet tight so you may want to adjust the size of your hook.
Directions:
Rnd 2: *2 sc in next 3 sc, sc in next 25 sc. Repeat from * 1 more time.
Rnd 3: *(2 sc in next sc, sc in next sc) 3 times. Sc in next 25 sc. Repeat from * 1 more time.
Rnd 4: *(2 sc in next sc, sc in next 2 sc) 3 times. Sc in next 25 sc. Repeat from * 1 more time.
Rnd 5: *(2 sc in next sc, sc in next 3 sc) 3 times. Sc in next 25 sc. Repeat from * 1 more time.
Rnd 6: Working the rnd in back loops, sc in each sc around.
Rnds 7 - 28: Sc in each sc around. At end of Rnd 28, join with a sl st to 1st sc. End off.
Using 1 strand light blue and 1 strand variegated and working from right to left, whipstitch in each sc of Rnd 28.
Center 1 round purse handle to each side and with 1 strand light blue and 1 strand variegated, sew each handle to each side.
--tip: I used small dots of hot glue to hold the handles down while I sewed them to the bag.
Cut 2 pieces of plastic canvas to fit inside bottom of bag. Sew together and place in bag.
***Debi Y.'s idea***
Materials:
- 4 1/2 oz. light blue worsted weight 4-ply acrylic
- 4 1/2 oz. variegated blues and brown bulky weight acrylic
- 1 pair light blue round purse handles
- L hook (if you crochet loose, use a J or a K hook - the bag fabric has to be tight)
- plastic canvas (for bottom liner)
Size: approximately 13 1/2" x 8" x 3 1/2"
Notes:
- do not join rounds, mark 1st stitch with a stitch marker.
- I crochet tight so you may want to adjust the size of your hook.
Directions:
Note: this is a dc example of how to work on the opposite side of chs. The purse pattern is worked in sc's.
Rnd 1: With 1 strand light blue and 1 strand variegated held together, ch 28, 3 sc in 2nd ch from hook. Sc in next 25 chs, 3 sc in last ch. Working on opposite side of chs, sc in next 25 chs.
Rnd 2: *2 sc in next 3 sc, sc in next 25 sc. Repeat from * 1 more time.
Rnd 3: *(2 sc in next sc, sc in next sc) 3 times. Sc in next 25 sc. Repeat from * 1 more time.
Rnd 4: *(2 sc in next sc, sc in next 2 sc) 3 times. Sc in next 25 sc. Repeat from * 1 more time.
Rnd 5: *(2 sc in next sc, sc in next 3 sc) 3 times. Sc in next 25 sc. Repeat from * 1 more time.
Rnd 6: Working the rnd in back loops, sc in each sc around.
Rnds 7 - 28: Sc in each sc around. At end of Rnd 28, join with a sl st to 1st sc. End off.
Using 1 strand light blue and 1 strand variegated and working from right to left, whipstitch in each sc of Rnd 28.
Center 1 round purse handle to each side and with 1 strand light blue and 1 strand variegated, sew each handle to each side.
--tip: I used small dots of hot glue to hold the handles down while I sewed them to the bag.
Cut 2 pieces of plastic canvas to fit inside bottom of bag. Sew together and place in bag.
***Debi Y.'s idea***
Labels:
pattern
Sunday, November 21, 2010
~ Ripples & Shells baby blanket ~
**This pattern was inspired by (and permission given by) Aggie May (Colleen) from Crochetville.**
**I have only worked this pattern up to the 21st round - it measures 26" x 34".**
**This baby blankie was crocheted with Red Heart's 'Peruvian Print' - it was crocheted for a boy. As with any of your projects - you can choose any color that you would like.**
For this blankie I used: 12 ounces of 4-ply worsted weight yarn
and a "J" hook
Notes:
v-st = dc, ch 2, dc
shell = 2 dc, ch 2, 2 dc
Directions:
Rnd 1: Ch 29, 4 dc in 4th ch from hook. Dc in next 24 chs, 5 dc in next ch. Now working on opposite side of ch, dc in next 24 chs. Join with a sl st to top of ch 3.
Rnd 2: Ch 3, dc in same st. 2 dc in each of next 4 dc. Dc in next 24 dc. 2 dc in each of next 5 dc. Dc in next 24 dc. Join as before.
Rnd 3: Ch 5, dc in same st. Skip next dc. *v-st in next dc, skip next dc. Repeat from * 3 more times. *skip next dc, 2 dc in next dc. Repeat from * 11 more times. (Skip next dc, v-st in next dc) 5 times. (Skip next dc, 2 dc in next dc) 12 times. Skip next dc, join with a sl st to 3rd ch of beginning ch 5.
Rnd 4: Sl st into ch 2 space, (ch 3, dc, ch 2, 2 dc) in same space. Shell in next 4 v-sts. *skip next 2 dc, 2 dc in next dc, ch 2, 2 dc in next dc. Repeat from * 5 more times. Skip next 2 dc, shell in next 5 v-sts. *skip next 2 dc, 2 dc in next dc, ch 2, 2 dc in next dc. Repeat from * 5 more times. Skip last 2 sts and join with a sl st to top of beginning ch 3.
Rnd 5: Sl st into next dc, ch 3, shell in shell, dc in next dc, skip next 2 dc. *Dc in next dc, shell in shell, dc in next dc, skip next 2 dc. Repeat from * 3 more times. Ch 1, shell in next 6 shells. Skip next 3 dc, ch 1. *Dc in next dc, shell in shell, dc in next dc, skip next 2 dc. Repeat from * 4 more times. Ch 1, join as before.
Rnd 6: Sl st in next dc, ch 3, dc in next dc, v-st in shell, dc in next 2 dc. *Skip next 2 dc, dc in next 2 dc, v-st in shell, dc in next 2 dc. Repeat from * 3 more times. Ch 1, shell in next 6 shells. Skip next 3 dc, ch 1, dc in next 2 dc, v-st in shell, dc in next 2 dc, skip next 2 dc, dc in next 2 dc, v-st in shell, dc in next 2 dc. Repeat from * 3 more times. Ch 1, skip next 3 dc, shell in next 6 shells. Ch 1, join as before.
For the pattern: repeat Rnd 5 three times and then Rnd 6 once increasing the number of dc along both sides of each ripple as necessary.
(The ripple points will be shell, shell, shell and then v-st)
***Debi Y's pattern***
Labels:
pattern
Wednesday, November 17, 2010
~ the oval ripple placemat~
**This pattern was inspired by Aggie May (Colleen) from Crochetville.**
***I think that this oval ripple pattern is only good for a placemat. I've been thinking (and RoseRed from Crochetville made mention) that the middle should be a lot longer to be able to retain the oval shape for an afghan. I will come up with a longer oval ripple in the next couple of days and post it here. :)
--The pictured placemat is 10 rounds and approximately 15" x 12 1/2".
I used: 4-ply worsted weight yarn
a "J" hook
Notes:
v-st = dc, ch 2, dc
shell = 2 dc, ch 2, 2 dc
Directions:
Rnd 1: Ch 13, 4 dc in 4th ch from hook. Dc in next 8 chs, 5 dc in next ch. Now working on opposite side of ch, dc in next 8 chs. Join with a sl st to top of ch 3. (26 dc)
Rnd 2: Ch 3, dc in same st. 2 dc in each of next 4 dc. Dc in next 8 dc. 2 dc in each of next 5 dc. Dc in next 8 dc. Join as before. (36 dc)
Rnd 3: Ch 5, dc in same st. Skip next dc. * v-st in next dc, skip next dc. Repeat from * around. Join with a sl st to 3rd ch of beginning ch 5. (18 v-sts)
Rnd 4: Sl st into ch 2 space, (ch 3, dc, ch 2, 2 dc) in same space. Shell in next 4 v-sts. *Dc in next v-st ch 2 space, dc in next dc, ch 2, dc in next dc, dc in next v-st ch 2 space. Repeat from * 1 more time. --these 2 groups are now called shells-- Shell in next 5 v-sts. $Dc in next v-st ch 2 space, dc in next dc, ch 2, dc in next dc, dc in next v-st ch 2 space. Repeat from $ 1 more time. --these 2 groups are now called shells-- Join with a sl st to top of ch 3.
Rnd 5: Sl st in next dc, ch 3, shell in shell, dc in next dc, skip next 2 dc. *Dc in next dc, shell in shell, dc in next dc, skip next 2 dc. Repeat from * around. Join as before.
Rnd 6: Sl st in next dc, ch 3, dc in next dc, v-st in shell, dc in next 2 dc, skip next 2 dc. *Dc in next 2 dc, v-st in shell, dc in next 2 dc, skip next 2 dc. Repeat from * around. Join as before.
Rnd 7: Sl st in next dc, ch 3, dc in next dc, shell in v-st, dc in next 2 dc, skip next 2 dc. *Dc in next 2 dc, shell in v-st, dc in next 2 dc, skip next 2 dc. Repeat from * around. Join as before.
Repeat Rnds 6 & 7 increasing 1 dc along both sides of each ripple each time you repeat Rnd 6.
***Debi Y's version***
Labels:
pattern
Sunday, September 5, 2010
~ A 'squircle' ~
My version of a circle in a square = a 'squircle'.
Materials:
- 4-ply worsted weight acrylic
- J hook
Size: 4 1/2"
Note: I crochet tight, so you may need to adjust the size of your crochet hook
Directions:
Rnd 1: Ch 3, 12 dc in 3rd ch from hook. Join with a sl st to 1st dc. (12 dc)
Rnd 2: Ch 2, 2 dc in each dc around. Join as before. (24 dc)
Rnd 3: (Ch 3, 2 dc, ch 2, 3 dc) in same dc. *Ch 1, skip next 2 dc, 3 dc in next dc. Ch 1, skip next 2 dc, (3 dc, ch 2, 3 dc) in next dc. Repeat from * 2 more times. Ch 1, skip next 2 dc, 3 dc in next dc. Ch 1, join with a sl st to top of beginning ch 3.
Rnd 4: Sl st over to ch 2 space, (ch 3, 2 dc, ch 2, 3 dc) in same space. *(ch 1, 3 dc in next ch 1 space) 2 times. Ch 1, (3 dc, ch 2, 3 dc) in corner ch 2 space. Repeat from * 2 more times. (ch 1, 3 dc in next ch 1 space) 2 times. Ch 1, join as before. End off. (If moving on to Rnd 5, do not end off.)
Optional Rnd 5: Ch 3, dc in each dc and ch 1 space around with (dc, ch 2, dc) in each corner ch 2 space. Join as before. End off.
***Debi Y's pattern***
Labels:
pattern
Wednesday, September 1, 2010
~ Drink cozies ~
A friend at work asked me to crochet a couple of drink cozies for her husband. He's been using the lime green one I crocheted for her a while ago and she want's it back. :)
Here's the quick and easy pattern for the manly drink cozy:
Materials:
- approximately 3/4 oz. each of 2 colors of worsted weight yarn
- K crochet hook
Notes:
- I crochet tight, so you may need to adjust the size of your crochet hook
- Do not join rounds - mark 1st stitch with a stitch marker
Directions:
Rnd 1: Working with 1 strand of each color held together, ch 2. 6 sc in 2nd ch from hook.
Rnd 2: 2 sc in each sc around.
Rnd 3: *2 sc in next sc, sc in next sc. Repeat from * around.
Rnd 4: *2 sc in next sc, sc in next 2 sc. Repeat from * around.
Rnd 5: *2 sc in next sc, sc in next 3 sc. Repeat from * around.
Rnd 6: Working this Rnd in back loops only, sc in each sc around.
Rnds 7 - 18: Sc in each sc around.
Rnd 19: Reverse sc in each sc around. Join with a sl st to 1st reverse sc. End off.
***Debi Y's version***
Labels:
pattern
Monday, August 30, 2010
~ My crochet hooks ~
I've had a couple readers ask me about my crochet hooks so I've decided to post about how I make them.
-- if you plan on adding a glass bead to the top, do that now. Use a head pin (found in the jewelry section in the craft store) to help secure the bead. You will have to cut the head pin about 1/8" from the bead.
***Edited to add:
Use only metal crochet hooks. I tried a plastic hook once and it drooped down.
For spotted handles:
Make a handle according to the instructions except use only 1 color. To get the spots - just roll out a small ball of clay - flatten it between your thumb and finger and apply to the un-baked handle. Then roll the handle on your table gently until the handle is smooth. Bake it, and then sand it according to the instructions.
~~~
A little snake made with Fimo white glitter mixed with 1 drop of food coloring.
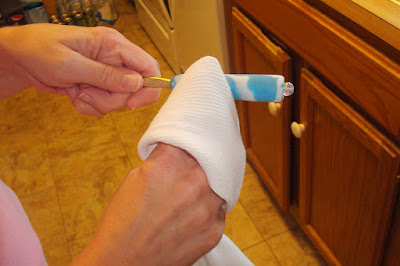
I made my first crochet hook handle in 2002 - I needed more substance to hold in my hand - I was having a problem with having to stop crocheting and stretch out my fingers every once in a while. I thought of tape but I didn't think that that would feel comfortable or look very nice. My next thought was polymer clay. I had a small stash of it leftover from trying to make beads, so I tried it and it worked great.
Step 1: Knead the polymer clay to make it more pliable. (by the way, I use Sculpey and Fimo polymer clays) - then roll into a rope. Twist the ropes together and then knead a little more.
Step 2: Wrap the polymer clay around your crochet hook handle and shape it to your preference. I roll the handle on my dining room table to help smooth it out.
To flatten the end - I gently drop it to the table:
-- if you plan on adding a glass bead to the top, do that now. Use a head pin (found in the jewelry section in the craft store) to help secure the bead. You will have to cut the head pin about 1/8" from the bead.
Step 3: Lay hook onto a bed of quilt batting - cover with an aluminum foil tent.
Step 4: Bake in a toaster oven or regular oven at 275* for 15 minutes per 1/4" thickness. Once baking is complete - leave the oven door open and the exhaust fan on to air it out.
Step 5: Dry sand the handle with 320 grit sandpaper. If you'd like, give it a good wet sanding with the 320 grit sandpaper also.
Step 6: Buff with an old t-shirt.
Once you get the gist of creating these handles, you can let your imagination go. My favorite style is swirling 2 or 3 colors together with a glass bead on top. I think they're pretty and they really help out my crocheting hand. :)
***Edited to add:
Use only metal crochet hooks. I tried a plastic hook once and it drooped down.
For spotted handles:
Make a handle according to the instructions except use only 1 color. To get the spots - just roll out a small ball of clay - flatten it between your thumb and finger and apply to the un-baked handle. Then roll the handle on your table gently until the handle is smooth. Bake it, and then sand it according to the instructions.
~~~
A little snake made with Fimo white glitter mixed with 1 drop of food coloring.
Labels:
crafts
Tuesday, May 11, 2010
Cute hanger
Doing laundry today and I thought of the pretty Japanese hanger that's making it's way around the blogs. I don't have wooden hangers - only the plastic ones you get at the Dollar Tree - so I sat down and crocheted this cute hanger.
Just sc all around (except for the hook part) - attach a pretty flower and admire! :)
Flower: With yellow, ch 4, 12 dc in 3rd ch from hook. Join with a sl st to first dc. End off.
Attach 1st flower color with a sc in back loop of any dc, ch 8. *Sc in back loop of next dc, ch 8. Repeat from * all the way around. Join with a sl st to 1st sc. End off.
Attach 2nd flower color with a sc in front loop of any dc, ch 6. *Sc in front loop of next dc, ch 6. Repeat from * all the way around. Join with a sl st to 1st sc. End off.
Glue button to yellow section. :)
***Debi Y's flower version***
Labels:
pattern
Friday, May 7, 2010
Debi Y's hexagon - version 2
Playing with my yarns again and this is my second version of a hexagon. Hope you like it.
Materials:
- 2 colors 4-ply ww acrylic
- J hook
Size: 5 1/2" point to point
Note: I crochet tight so you may want to adjust the size of your hook.
Directions:
Rnd 1: With 1st color, ch 4, dc in 3rd ch from hook, ch 2. (2 dc, ch 2) 5 more times in same ch. Join with a sl st to top of ch 3. End off.
Rnd 2: Join 2nd color with a sl st in any ch 2 space, (ch 3, dc, ch 2, 2 dc) in same space. (2 dc, ch 2, 2 dc) in each ch 2 space around. Join as before.
Rnd 3: Sl st over to ch 2 space, (ch 3, 2 dc, ch 2, 3 dc) in same space, ch 1. *(3 dc, ch 2, 3 dc) in next ch 2 space, ch 1. Repeat from * around. Join as before.
Rnd 4: Ch 3, dc in each dc and ch 1 space around with 3 dc in each ch 2 space. Join as before. End off.
**Debi Y's version 2**
Labels:
pattern
Sunday, March 21, 2010
Debi Y's hexagon - version 1 - **pattern fixed**
I've been crocheting lots of grannies trying to use up some of my yarn and to give me a project that I can tote back and forth to work. I wanted to try a different motif so here is my version of a hexagon. I have crocheted this one in just one color, but I'm thinking of crocheting them in 3 colors. Maybe I'll do a mix - solid hex's, variegated hex's and multi-color hex's. :)
Materials:
- 4-ply ww acrylic yarn
- I hook
Size: 5" side to side
Notes:
- beginning shell = (ch 3, dc, ch 2, 2 dc)
- shell = (2 dc, ch 2, 2 dc)
- ch 3 at beginning of Rnd 1 does not count as a stitch
Directions:
Rnd 1: Ch 3, 12 dc in 3rd ch from hook. Join with a sl st to 1st dc. (12 dc)
Rnd 2: Ch 1, sc in same st, ch 3. *Skip next dc, sc in next dc, ch 3. Repeat from * around. Join with a sl st to 1st sc. (6 ch 3 loops)
Rnd 3: Sl st into ch 3 space. Beginning shell in same ch 3 space, ch 1. *Shell in next ch 3 space, ch 1. Repeat from * around. Join with a sl st to top of ch 3.
Rnd 4: Sl st over to ch 2 space. Beginning shell in same ch 2 space. Ch 1, 2 dc in next ch 1 space. *Ch 1, shell in next shell. Ch 1, 2 dc in next ch 1 space. Repeat from * around. Join as before.
Rnd 5: Sl st over to ch 2 space. Beginning shell in same ch 2 space. Ch 1, 2 dc in each ch 1 space across. *Ch 1, shell in next shell. Ch 1, 2 dc in each ch 1 space across. Repeat from * around. Join as before. End off.
**Debi Y.'s - version 1**
Labels:
pattern
Sunday, February 14, 2010
Psuedo flower
~~I know there's hundreds of these patterns, but I just couldn't resist adding my own.
Materials:
- size 10 thread
- size 1 steel hook
=or=
- baby yarn
- size G hook
Note: Ch 2 at the beginning of 1st 3 rnds does not count as a stitch.
Directions:
Rnd 1: Ch 3, 12 dc in 3rd ch from hook. Join with a sl st to 1st dc. (12 dc)
Rnd 2: Ch 2, 4 dc in each dc around. Join as before.
Rnd 3: Ch 2, 3 dc in each dc around. Join as before.
Rnd 4: Ch 1, sc in same st. *Ch 2, sc in next dc. Repeat from * around. Ch 2, join with a sl st to 1st sc. End off.
**Debi Y's version**
Labels:
pattern
Tuesday, February 9, 2010
My blue scarf
I love ruffle scarves but I don't love the ruffle around my face. Here is my solution:
My blue scarf
Materials:
- 6 oz. ww 4-ply yarn (I used a discontinued Red Heart yarn)
- J hook
Size: 4 1/4" x 60"
Note: I crochet tight so you may want to adjust the size of your hook.
Directions:
Row 1: Ch 197, (sc, dc) in 2nd ch from hook. *Skip next ch, (sc, dc) in next ch. Repeat from * across. Turn.
Rows 2 - 8: (Sc, dc) in each sc across. Turn.
Row 9: Skip 1st dc, sc in next sc. *Ch 2, skip next dc, sc in next sc. Repeat from * across. Turn.
Row 10: Sl st into ch 2 space, ch 3, 2 dc in same space. 3 dc in each ch 2 space across. Ch 3, turn.
Row 11: Dc in 1st dc, 2 dc in each dc across. Ch 1, turn.
Row 12: Sc in each dc across. End off.
**Debi Y's version**
Labels:
pattern
Sunday, January 24, 2010
V-st baby cocoon
Materials:
- 6 oz. off white Caron Simply Soft
- 1 and 1/4 oz. light blue Caron Simply Soft
- 1 and 1/4 oz. medium blue Caron Simply Soft
- L hook
Size: 11" x 15"
Notes:
- I crochet tight so you may need to adjust the size of your hook.
Size: 11" x 15"
Notes:
- I crochet tight so you may need to adjust the size of your hook.
- Ch 2 at beginning of Rnds. 1 - 4 do not count as a stitch.
- beg V-st: (ch 4, dc)
- V-st: (dc, ch 1, dc)
Directions:
Rnd 1: With 2 strands of off white held together, ch 3, 13 dc in 3rd ch from hook. Join with a sl st to 1st dc. (13 dc)
Rnd 2: Ch 2, 2 dc in each dc around. Join as before. (26 dc)
Rnd 3: Ch 2, 2 dc in 1st dc, dc in next dc. *2 dc in next dc, dc in next dc. Repeat from * around. Join as before.
Rnd 4: Ch 2, 2 dc in 1st dc, dc in next 2 dc. *2 dc in next dc, dc in next 2 dc. Repeat from * around. Join as before. (48 dc)
Rnd 5: Beg V-st in 1st dc, skip next dc. *V-st in next dc, skip next dc. Repeat from * around. Join with a sl st to 3rd ch of beg V-st. (24 v-sts)
Rnds 6 - 17: Sl st in next ch, beg V-st. V-st in each V-st around. Join as before. At end of Rnd 17, end off.
Rnd 18: Working with 1 strand of light blue and 1 strand of medium blue held together, join with a sl st in ch 1 sp of 1st V-st. Beg V-st in same sp. V-st in each V-st around. Join as before.
Rnds 19 - 23: Sl st in next ch, beg V-st. V-st in each V-st around. Join as before.
Rnd 24: Ch 1, sc in same ch. Sc in each ch sp and dc around. Join with a sl st to 1st sc. End off.
**Debi Y's pattern**
Labels:
pattern
Saturday, January 23, 2010
Round coaster
I crocheted this little coaster while eating my snack yesterday at work. I have a few now that I can switch back and forth.
Materials:
- small amount ww acrylic (I used Bernat pink camo)
- I crochet hook
Note: Ch 2 does not count as a stitch.
Directions:
Rnd 1: Ch 3, 12 dc in 3rd ch from hook. Join with a sl st to 1st dc. (12 dc)
Rnd 2: Ch 2, 2 dc in each dc around. Join as before. (24 dc)
Rnd 3: Ch 1, 2 sc in 1st dc, sc in next dc. *2 sc in next dc, sc in next dc. Repeat from * around. Join with a sl st to 1st sc.
Rnd 4: Ch 1, sc in 1st sc, *ch 3, skip next st, sc in next st. Repeat from * around. Join with a sl st to 1st sc. Holding the ch 3 stitches to the front, sc in next skipped st, *ch 4, sc in next skipped st. Repeat from * around. Join with a sl st to 1st sc, end off.
**Debi Y's version**
Labels:
pattern
Friday, January 1, 2010
"Round in circles" scarf
I've started working on a new scarf for me. It's simple and kind of cute.
Materials:
- 4-ply ww acrylic yarn (I used TLC Heathers)
- I crochet hook
Size: each circle measures approximately 4 3/4" across
Notes:
- ch 2 at beginning of rnds 1 - 3 do not count as a st.
- I crochet tight so you may want to adjust the hook size
Directions:
#1st circle:
Rnd 1: Ch 3, 12 dc in 3rd ch from hook. Join with a sl st to 1st dc. (12 dc)
Rnd 2: Ch 2, 2 dc in each dc around. Join as before. (24 dc)
Rnd 3: Ch 2, 2 dc in same dc, dc in next dc. *2 dc in next dc, dc in next dc. Repeat from * around. Join as before.
Rnd 4: Ch 1, 2 sc in same dc, sc in next 2 dc. *2 sc in next dc, sc in next 2 dc. Repeat from * around. Join with a sl st to 1st sc.
Rnd 5: Ch 1, sc in same sc, ch 3. *Skip next sc, sc in next sc, ch 3. Repeat from * around. Join as before. End off.
#2nd circle:
Rnds 1 - 4: Repeat Rnds 1 - 4 of 1st circle.
Rnd 5: Ch 1, sc in any loop on 1st circle. Ch 1, skip next sc on 2nd circle, sc in next sc. *Ch 1, sc in next loop on 1st circle, ch 1, skip next sc on 2nd circle, sc in next sc. Repeat from * 2 more times. @Ch 3, skip next sc, on 2nd circle, sc in next sc. Repeat from @ around. Ch 3, join as before. End off.
#All remaining circles:
Rnds 1 - 4: Repeat Rnds 1 - 4 of 1st circle.
Rnd 5: Ch 1, sc in 9th loop on previous circle. Ch 1, skip next sc on working circle, sc in next sc. *Ch 1, sc in next loop on previous circle, ch 1, skip next sc on working circle, sc in next sc. Repeat from * 2 more times. @Ch 3, skip next sc on working circle, sc in next sc. Repeat from @ around. Ch 3, join as before. End off
Crochet as many circles as you would like to get the length you need.
*Thanks to Aluajala for this idea = Try crocheting the 1st 2 rnds in yellow, and then the rest of the rnds in different flower colors.
**Debi Y's idea**
Labels:
pattern
Subscribe to:
Posts (Atom)