Showing posts with label crafts. Show all posts

Monday, November 14, 2011

~ candles ~


I made these candles this morning - they're very quick and easy to do. 

All you need to create a nice gift for someone is the following:


The candle gel, candle scents, and wicks (if preferred) can be purchased from your local craft store.  I bought this candle gel from QVC years ago.  (For my Jewish friends - I mean no disrespect by using Chanukah candles).  Plus you'll need glass mugs and small heat resistent items - such as glass gems and small stones.  Those 3 items can be purchased from your local Dollar Tree.  (Sorry - I forgot to add those to the picture).

Fill your glass mug with the glass gems or the stones, insert one of the Chanukah candles (or a regular wick you bought from the craft store) in the middle, follow the directions for heating the candle gel, add the scent and then pour the liquid into the glass mug.  Let it cool and there you have it - a pretty candle. 

I have to warn you that making these candles is addicting.  My next purchase from the Dollar Tree will include more glass mugs.  :)     
Print Friendly and PDF

Friday, October 21, 2011

~ kitchen rug finished ~

Finally finished up my new kitchen rug yesterday.  I glued the foamy kind of shelf liner to the back to keep it from sliding around.  My son Bobby says "it pulls the whole room together" - a line from the movie "The Big Lebowski" - and my grandson William was afraid to step on it.  :)

 
Print Friendly and PDF

Wednesday, September 14, 2011

~ seeing spots ~

When Tracie at 'CroCreations' saw my crochet hooks, she was inspired to create some of her own.  I have only created swirly handles, but when I saw Tracie's polka dot hooks, I was inspired to try to create one. 


I have to tell you that doing polka dots is kind of tricky.  Mine did not stay perfectly round.  But that's ok - I like it anyway.  In fact, I think this is my new 'favorite' hook.  It's a Susan Bates size 'J'. 

And speaking of Susan Bates - I bought 2 new hooks (plus some Red Heart Soft yarn) from Herrschners and they are different.  The head of the hook is not pointy like it used to be - they are rounded - and the actual hook part is smaller.  I hope I won't have trouble trying to hook the yarn when I'm crocheting.

 **eta - I have been using this hook for a while now and I have had absolutely no problems crocheting with it.  (I haven't tried a tight sc pattern (like amigurumi) - there might be a problem there since there is no point to help push thru the stitch.)   
Print Friendly and PDF

Tuesday, September 13, 2011

~ Hook reminders ~


Eileen from 'Crochet Attic' posted her progress on the pretty granny stripe she's working on and she asked a question.  The question is:  "do any of you ever set a project aside and when you go back to it you can't remember which hook you were using?" 

Nowadays, I'm lucky if I remember what I had for breakfast.  I forget alot of stuff and have to make notes all the time.  My solution to the hook problem is I'm sure, not a new one.  I take safety pins and letter beads and pin it to a project if I put that project down for a time.  I also use this for my scrap yarn cakes when I wind them - 'A' for the 1st one, 'B' for the second one, and so on.  This has saved me from alot of aggravation.  :)   
Print Friendly and PDF

Wednesday, July 6, 2011

~ re-post for Heldasland ~


~~this re-post is for you Helda~~

I made my first crochet hook handle in 2002 - I needed more substance to hold in my hand - I was having a problem with having to stop crocheting and stretch out my fingers every once in a while. I thought of tape but I didn't think that that would feel comfortable or look very nice. My next thought was polymer clay. I had a small stash of it leftover from trying to make beads, so I tried it and it worked great.

This is how I create my crochet hook handles:

Step 1: knead the polymer clay to make it more pliable. (by the way, I use Sculpey and Fimo polymer clays)

Step 2: wrap the polymer clay around your crochet hook handle and shape it to your preference. I roll the handle on my dining room table to help smooth it out.

Step 3: bake in a toaster oven at 275* for 15 minutes per 1/4" thickness.

Once you get the gist of creating these handles, you can let your imagination go. My favorite style is swirling 2 or 3 colors together with a glass bead on top. I think they're pretty and they really help out my crocheting hand. :)

***Edited to add a couple of tips:

1. use only metal crochet hooks. I tried a plastic hook once and it drooped down.

2. lay the polymer clay hook on a soft bed of quilt batting.

3. fashion a little tent out of aluminum foil to cover the hook and quilt batting while baking.

~~~~~~~~~~~~~~
Here's the link to the post where there is more instructions:

http://hooksandyarns.blogspot.com/2010/08/my-crochet-hooks.html
Print Friendly and PDF

Thursday, February 10, 2011

~ crochet hooks re-post ~

Hi Nicole - this re-post is for you.  :)


I made my first crochet hook handle in 2002 - I needed more substance to hold in my hand - I was having a problem with having to stop crocheting and stretch out my fingers every once in a while. I thought of tape but I didn't think that that would feel comfortable or look very nice. My next thought was polymer clay. I had a small stash of it leftover from trying to make beads, so I tried it and it worked great.

This is how I create my crochet hook handles:

Step 1: knead the polymer clay to make it more pliable. (by the way, I use Sculpey and Fimo polymer clays)

Step 2: wrap the polymer clay around your crochet hook handle and shape it to your preference. I roll the handle on my dining room table to help smooth it out.

-- if you plan on adding a glass bead to the top, do that now.  Use a head pin (found in the jewelry section in the craft store) to help secure the bead.  You will have to cut the head pin about 1/8" from the bead.

Step 3: bake in a toaster oven at 275* for 15 minutes per 1/4" thickness.

Once you get the gist of creating these handles, you can let your imagination go. My favorite style is swirling 2 or 3 colors together with a glass bead on top. I think they're pretty and they really help out my crocheting hand. :)

***Edited to add a couple of tips:

1.  use only metal crochet hooks.  I tried a plastic hook once and it drooped down.

2.  lay the polymer clay hook on a soft bed of quilt batting.

3.  fashion a little tent out of aluminum foil to cover the hook and quilt batting while baking.

** this post has pictures ** http://hooksandyarns.blogspot.com/2010/08/my-crochet-hooks.html

Print Friendly and PDF

Monday, August 30, 2010

~ My crochet hooks ~

I've had a couple readers ask me about my crochet hooks so I've decided to post about how I make them.

I made my first crochet hook handle in 2002 - I needed more substance to hold in my hand - I was having a problem with having to stop crocheting and stretch out my fingers every once in a while. I thought of tape but I didn't think that that would feel comfortable or look very nice. My next thought was polymer clay. I had a small stash of it leftover from trying to make beads, so I tried it and it worked great.


This is how I create my crochet hook handles:

What you will need:
 
Step 1:  Knead the polymer clay to make it more pliable. (by the way, I use Sculpey and Fimo polymer clays) - then roll into a rope.  Twist the ropes together and then knead a little more.
Step 2:  Wrap the polymer clay around your crochet hook handle and shape it to your preference. I roll the handle on my dining room table to help smooth it out.

To flatten the end - I gently drop it to the table:

-- if you plan on adding a glass bead to the top, do that now.  Use a head pin (found in the jewelry section in the craft store) to help secure the bead.  You will have to cut the head pin about 1/8" from the bead.
 

Step 3:  Lay hook onto a bed of quilt batting - cover with an aluminum foil tent.


Step 4:  Bake in a toaster oven or regular oven at 275* for 15 minutes per 1/4" thickness.  Once baking is complete - leave the oven door open and the exhaust fan on to air it out.

Step 5:  Dry sand the handle with 320 grit sandpaper.  If you'd like, give it a good wet sanding with the 320 grit sandpaper also.


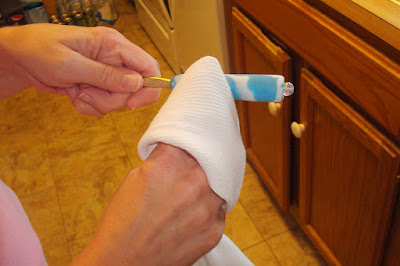
Step 6:  Buff with an old t-shirt.

Once you get the gist of creating these handles, you can let your imagination go. My favorite style is swirling 2 or 3 colors together with a glass bead on top. I think they're pretty and they really help out my crocheting hand.  :)

***Edited to add:

Use only metal crochet hooks. I tried a plastic hook once and it drooped down.


For spotted handles:

Make a handle according to the instructions except use only 1 color. To get the spots - just roll out a small ball of clay - flatten it between your thumb and finger and apply to the un-baked handle.  Then roll the handle on your table gently until the handle is smooth.  Bake it, and then sand it according to the instructions.
~~~

A little snake made with Fimo white glitter mixed with 1 drop of food coloring.

Print Friendly and PDF