Tuesday, August 23, 2011

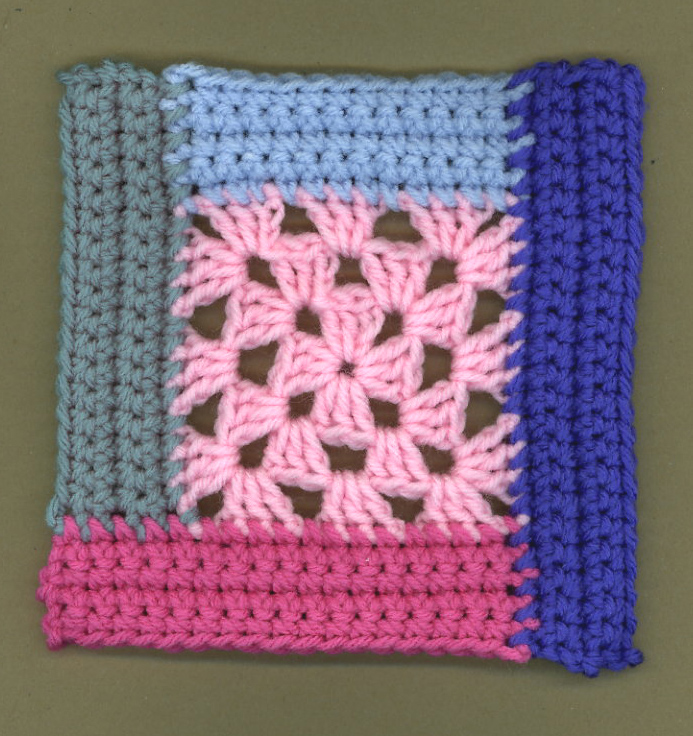
~ granny's cabin square ~

Inspired by my friend Heather at 'The Good Life' who's crocheting a log cabin afghan, I crocheted this 'granny's cabin square'.


Materials:
- 4-ply worsted weight acrylic
- J hook

Directions:

Crochet a 3 round granny square - make sure you only chain 2 for the corners and only chain 1 in between the 3 dc clusters.

1st side: 
Row 1:  join light blue with a sc in corner space, sc in each sc and ch 1 space across, sc in corner space.  Ch 1, turn.

Rows 2 - 5:  sc in each sc across.  Ch 1, turn.  At end of Row 5, end off.

2nd side:
Row 1:  join mint green with a sc in side of 1st light blue sc.  Work 4 more sc along the side of the light blue.  Sc in corner space,  sc in each sc and ch 1 space across, sc in corner space.  Ch 1, turn.

Rows 2 - 5:  Repeat Rows 2 - 5 of 1st side.

3rd side:
Row 1:  join dark pink with a sc in side of 1st mint green sc.  Work 4 more sc along the side of the mint green.  Sc in corner space, sc in each sc and ch 1 space across, sc in corner space.  Ch 1, turn.

Rows 2 - 5:  Repeat Rows 2 - 5 of 1st side.

4th side:
Row 1:  join purple with a sc in side of 1st dark pink sc.  Work 4 more sc along the side of the dark pink.  Sc in corner space, sc in each sc and ch 1 space across, sc in corner space.  Work 5 along the side of the light blue.  Ch 1, turn.

Rows 2 - 5:  Repeat Rows 2 - 5 of 1st side.

***Debi Y's pattern***

Print Friendly and PDF

Friday, August 5, 2011

~ straight up granny ~

After I finished my granny ripple bag, I wanted to start another baby blankie.  I wanted to do a granny stitch, so I went and got my Jan Eaton book "200 Crochet Blocks" and found her 'granny stripes' pattern.  I love Jan Eaton's patterns, but the edges weren't working for me, so I figured a different way.  Also - I'm not working stripes, so I decided to call this baby blankie 'straight up granny'.  I hope it all makes sense.  If you have any questions let me know.  :)

**Please note that I am not claiming this pattern as my own - it belongs to Jan Eaton - I only changed the way the edges are.

 Repeat Rows 2 and 3 for pattern.
Print Friendly and PDF

Saturday, July 30, 2011

~ 4-hearts square (ice cream & cupcakes too) ~

I wanted to try and come up with a heart square but I couldn't get it to work the way I wanted.  I only wanted 1 heart.  I was able to figure out this 4 hearts square though.  I sat down and came up with this pattern all on my own, but it does seem familiar - have any of you ladies & gentlemen ever seen a square like this before?  If you have, could you please let me know.  Thanks so much.  :)
**this square measures 5 3/4" - I crocheted it with RHSS and I used a 'J' hook.


~~The Butterfly Bush Diaries left me a comment saying that this reminded her of a clover.  A few of these squares crocheted in green would make nice potholders for St. Patrick's day. 

Materials:
- 4-ply worsted weight acrylic
   - pink
   - white
- J hook

Size:  Rnds 1 - 5 is approximately 5 3/4" but you can always add more rnds.

Notes:
- I crochet tight so you may need to adjust the size of your crochet hook.

Directions:
Rnd 1:  With pink ch 4, 2 dc in 4th ch from hook, ch 2.  (3 dc, ch 2, in same ch) 3 more times.  Join with a sl st to top of beginning ch.

Rnds 2 - 3:  Ch 3, dc in each dc around with (2 dc, ch 2, 2 dc) in corner ch-2 spaces.  For Rnd 2, join with a sl st to top of beginning ch 3.  For Rnd 3, join with a sl st to back loop of the top of beginning ch 3.  End off.

Rnd 4:  Join white with a sl st to any corner space, (ch 3, 1 dc, ch 2, 2 dc) in same space.  Dc in the back loops of each dc across.  Work (2 dc, ch 2, 2 dc) in each corner space.  Join with a sl st to top of beginning ch 3.


Rnd 5:  Ch 3, dc in each dc around with (2 dc, ch 2, 2 dc) in each corner space around.  Join as before. 

~~you can end off here or continue to make the square any size that you would like

For heart tops:

Join pink with a sl st to 1st front loop on any side of Rnd 3.  *skip next front loop, 3 dc in each of next 2 front loops, skip next front loop, sl st in next front loop.  Repeat from * 1 more time.  End off.

Repeat for next 3 sides.  Tack down heart tops.


***Debi Y's pattern***
~~~~~


~ ice cream cones square ~

Rnds 1 - 3:  with brown, follow Rnds 1 - 3 of '4 hearts square' pattern.

Rnds 4 - 5:  with soft white, follow Rnds 4 - 5 of '4 hearts square' pattern.

- you can add a rnd of sc if you'd like.

For ice cream tops:

Row 1:  join your color choice with a sl st to 1st front loop on any side of Rnd 3, skip next front loop, 5 dc in next front loop, skip next 2 front loops, sc in next front loop, skip next 2 front loops, 5 dc in next front loop, skip next front loop, sl st in last front loop.  Ch 1, turn.

Row 2:  Sl st over to 3rd dc, ch 1, sc in same dc, skip next 2 dc, 5 dc in next sc, skip next 2 dc, sc in next dc, sl st in next 2 dc, sl st in same front loop as beginning sl st of Row 1.  End off.

- tack down tops of ice cream.

~~~~~


~ cupcakes square ~

Rnd 1:  with soft white, follow Rnd 1 of '4 hearts square' pattern.

Rnds 2 - 3:  with brown, follow Rnds 2 - 3 of '4 hearts square' pattern.

Rnds 4 - 5:  with soft white, follow Rnds 4 - 5 of  '4 hearts square' pattern.

- you can add a rnd of sc if you'd like

For cupcake tops:

Rows 1 - 2:  follow Rows 1 - 2 of ice cream tops.

- tack down tops of cupcakes

- I used Sharpie permanent markers to make the sprinkles 

***Debi Y's pattern***

Print Friendly and PDF

Wednesday, July 6, 2011

~ re-post for Heldasland ~


~~this re-post is for you Helda~~

I made my first crochet hook handle in 2002 - I needed more substance to hold in my hand - I was having a problem with having to stop crocheting and stretch out my fingers every once in a while. I thought of tape but I didn't think that that would feel comfortable or look very nice. My next thought was polymer clay. I had a small stash of it leftover from trying to make beads, so I tried it and it worked great.

This is how I create my crochet hook handles:

Step 1: knead the polymer clay to make it more pliable. (by the way, I use Sculpey and Fimo polymer clays)

Step 2: wrap the polymer clay around your crochet hook handle and shape it to your preference. I roll the handle on my dining room table to help smooth it out.

Step 3: bake in a toaster oven at 275* for 15 minutes per 1/4" thickness.

Once you get the gist of creating these handles, you can let your imagination go. My favorite style is swirling 2 or 3 colors together with a glass bead on top. I think they're pretty and they really help out my crocheting hand. :)

***Edited to add a couple of tips:

1. use only metal crochet hooks. I tried a plastic hook once and it drooped down.

2. lay the polymer clay hook on a soft bed of quilt batting.

3. fashion a little tent out of aluminum foil to cover the hook and quilt batting while baking.

~~~~~~~~~~~~~~
Here's the link to the post where there is more instructions:

http://hooksandyarns.blogspot.com/2010/08/my-crochet-hooks.html
Print Friendly and PDF

Sunday, July 3, 2011

~ TMNT bottle cozy ~

I came upon this pattern one day while checking out Crochet Pattern Central - it's a cute coffee cup cozy.  My grandsons like the TMNT's (Teenage Mutant Ninja Turtles) so I thought of them when I first saw it.  The only thing, of course, is that they don't drink coffee - so I crocheted a bottle cozy.  This is the purple one - I think it's Leonardo - he's for James.  I am almost finished with the orange one - Michaelangelo - he's for William.  :)


Materials:
- 4-ply worsted weight acrylic
  - green
  - mask color
- J hook
- pair of 1" wiggle eyes

Size:  fits 16.9 oz. bottle

Notes:
- I crochet tight so you may want to adjust the size of your crochet hook
- The ch 2 at the beginning of the dc rnds does not count as a stitch

Directions:

Rnd 1:  With green, ch 3, 12 dc in 3rd ch from hook.  Join with a sl st to 1st dc.  (12 dc)

Rnd 2:  Ch 2, 2 dc in each dc around.  Join as before.  (24 dc)

Rnd 3:  Ch 1, 2 sc in same st as joining, sc in next 5 dc.  (2 sc in next dc, sc in next 5 dc) 3 more times.  Join with a sl st to 1st sc.  (28 sc)  

Rnd 4:  Working this rnd only in back loops, ch 1, sc in each sc around.  Join as before.  

Rnd 5:  Ch 2, dc in each sc around.  Join with a sl st to 1st dc.

Rnd 6:  Ch 1, sc in each dc around.  Join with a sl st to 1st sc.

Rnds 7 - 10:  Repeat Rnds 5 - 6.

Rnd 11:  Repeat Rnd 5.  End off.

Rnd 12:  Join mask color with a sl st to 1st dc.  Ch 1, sc in each dc around.  Join with a sl st to 1st sc.  

Rnds 13 - 16:  Repeat Rnds 5 - 6.  At end of Rnd 16, end off.

Rnd 17:  Join green with a sl st to 1st sc.  Ch 2, dc in each sc around.  Join with a sl st to 1st dc.

Rnd 18:  Repeat Rnd 6.  End off.

- glue eyes to mask

***Debi Y's pattern***
Print Friendly and PDF

Sunday, June 12, 2011

~ sunglasses case ~


Erica asked me to crochet her a sunglasses case and this is what I came up with.

Materials:
- a little more than 1 oz. 4-ply ww acrylic
- J hook

Size:  4" x 7"

Notes:
- I crochet tight so you may want to adjust the size of your crochet hook
- The 1st Rnd is the only Rnd that is joined.  Do not join at the end of Rnds 2 through 22, use a stitch marker to mark your 1st st.

Directions:

Rnd 1:  Ch 12, 3 sc in 2nd ch from hook.  Sc in next 9 chs, 3 sc in last ch.  Now working on the opposite side of the ch, sc in same 9 chs, join with a sl st to 1st sc.  (you have just crocheted an oval shape)

Rnd 2:  Ch 1, (sc, dc) in same sc as joining.  (sc, dc) in next 2 sc.  {skip next sc, (sc, dc) in next sc} 4 times.  Skip next sc, (sc, dc) in next 3 sc.  {skip next sc, (sc, dc) in next sc} 4 times.

Rnds 3 - 22:  (sc, dc) in each sc around.  At end of Rnd 22 join with a sl st to 1st sc, end off.

Add a chain loop to the back and a button to the front if desired.


***Debi Y's version***
Print Friendly and PDF

Wednesday, June 8, 2011

~ popcorn hexagon ~

 
Posted by Picasa

~~can I have butter on that?

Materials:
- 4-ply ww acrylic
- J hook

Size:  6 1/2" side to side or 7 1/4" point to point

Notes:
- ch 2 at beginning of Rnds 1 & 2 do not count as a stitch
- I crochet tight so you may want to adjust the size of your hook
- 3 dc popcorn st = 3 dc in st, pull up loop and remove hook, insert hook in 1st dc and in dropped loop, yarn over and pull through.

Directions:

Rnd 1:  Ch 3, 12 dc in 3rd ch from hook.  Join with a sl st to 1st dc.  (12 dc)

Rnd 2:  Ch 2, 2 dc in each dc around.  Join as before.  (24 dc)

Rnd 3:  (ch 3, 2 dc) in same dc as joining, pull up loop and remove hook, insert hook in top of chain and in dropped loop, yarn over and pull through, ch 2.  *popcorn st in next dc, ch 2.  Repeat from * around.  Join with a sl st to top of 1st popcorn st. 

Rnd 4:  Sl st into ch-2 space, ch 1, sc in same space, ch 2.  *sc in next ch-2 space, ch 2.  Repeat from * around.  Join with a sl st to 1st sc.

Rnd 5:  Sl st into ch-2 space, (ch 3, 2 dc, ch 2, 3 dc) in same ch-2 space, ch 1.  *skip next ch-2 space, 3 dc in next ch-2 space, ch 1, skip next ch-2 space, (3 dc, ch 2, 3 dc) in next ch-2 space.  Repeat from * 4 more times.  Ch 1, skip next ch-2 space, 3 dc in next ch-2 space, ch 1, skip next ch-2 space, join with a sl st to top of beginning ch 3.

Rnd 6:  Ch 3, dc in each dc and ch-1 space around with (dc, ch 2, dc) in each corner space.  Join as before.  End off.

***Debi Y's version***
Print Friendly and PDF